Quantcast
Channel: Windows 10 - System Center Dudes
Viewing all 73 articles
Browse latest View live

How to configure Windows Analytics with Log Analytics

$
0
0

Windows Analytics is the suite name following the original release of Upgrade readiness. The suite adds Device Health and Update Compliance under the same roof. Depending on the environment each sub-product will provide key information for end-user computer admins. Windows Analytics and Log Analytics is better together!

Upgrade readiness can help assess applications and drivers compatibility prior to migrate from Windows 7/8.1 to Windows 10, or even from one Windows 10 build to another.

Device Health provides extra information for admins to review various crash within their environment.

Update compliance provides a way to track how updates and upgrades are doing in the environment. This will be particularly useful when mixed with Windows Update for Business.

All of the Windows Analytics features sit on Log Analytic from Azure. Previously it was possible to host the data in OMS. OMS as retired and it is possible to move it into Log Analytics.

In this post, we will show how to configure Windows Analytics with Log Analytics

Windows Analytics Log Analytics Requirements

  • Rights to create the Log Analytics :
    • Global admin
    • Contributor on the associated Azure subscription
  • Download the Upgrade readiness deployment script here
  • For Upgrade readiness clients
    • Windows 7 or higher
  • For Update compliance clients
    • Windows 10 Pro or higher
    • Semi-annual channel or LTSC
  • For DEvice health clients
    • Windows 10 Enterprise or Education

Configure Log Analytics workspace

  • Go to Azure portal
  • Click on Create a resource and search for Log Analytics. Once found, click Create
Windows Analytics Log Analytics
  • Select Create New
    • Select the Subscription type.
    • The resource group can be a new or existing one.
    • The pricing tier will be Per GB
Windows Analytics Log Analytics
Pricing Tier

Previously with OMS, it was clear that Windows Analytics was free. Moving to Log Analytics, it is still a free service. But when selecting the Pricing tier, the Free option is no longer available. Seems that if you still see the Free tier, it’s likely because OMS with Upgrade readiness was configured before.

For newer environment, the option of Per GB will be the only choice. but again, it remains free. Looking at the data usage in Log Analytics, we can see that the content is not billable.

Windows Analytics Log Analytics
  • Click Ok to create the Log Analytics. this will take a little time to complete.
Windows Analytics Log Analytics

Configure Upgrade Readiness

  • Go to Azure portal
  • Click on Create a resource and search for Upgrade Readiness
Windows Analytics Log Analytics
  • Click Create
Windows Analytics Log Analytics
  • Click on Select a Workspace under the Log Analytics Workspace, and then select the one created in the previous step
Windows Analytics Log Analytics
  • Click Create at the bottom

Configure Device Health

  • Go to Azure portal
  • Click on Create a resource and search for Device Health. Click Create
Windows Analytics Log Analytics
  • Click on Select a Workspace under the Log Analytics Workspace, and then select the one created in the previous step
Windows Analytics Log Analytics
  • Click Create at the bottom

Configure Update Compliance

  • Go to Azure portal
  • Click on Create a resource and search for Device Health. Click Create
Windows Analytics Log Analytics
  • Click on Select a Workspace under the Log Analytics Workspace, and then select the one created in the previous step
Windows Analytics Log Analytics
  • Click Create at the bottom

Access Windows Analytics components

  • Go to Azure portal
  • Search for Log Analytics and select Log Analytics Workspaces
Windows Analytics Log Analytics
  • Click on the Log Analytics for the 3 Windows Analytics components
Windows Analytics Log Analytics
  • Select Solutions. The 3 Windows Analytics components are available.
Windows Analytics Log Analytics
  • To make it easy to access, pin each summary to the Azure Dashboard. Click on any one of the 3 and select Pin to dashboard from the Summary.
Windows Analytics Log Analytics

Configure data collection for Windows Analytics with the script

The computers that you want to evaluate needs to run a script to send their data.

To do so :

  • Download the Upgrade Readiness deployment script
  • Extract the zip file
  • Edit .\ UpgradeAnalytics092816\Deployment\RunConfig.bat file
  • Change the following values :
    • LogPath : Where you want the logs to be saved
    • CommercialIDValue : Enter your commercial key
    • Logmode : 1
  • Deploy the script using any methods
  • Once deployed, it will take a good 2 to 3 days before data starts populating in the 3 components of Windows Analytics. This will be the same no matter which solution is chosen to enable Windows Analytics on clients.
Commercial ID

To find the CommercialID:

  • Go to Upgrade readiness and select Solution settings
Windows Analytics Log Analytics
  • Under Upgrade Readiness settings, the CommercialID is available.
Windows Analytics Log Analytics

Configure data collection for Windows Analytics with Intune

Most settings for Windows Analytics are configured by OME-URI items.

  • In a device restriction profile, under Reporting and Telemetry make the Share user Data up to Enhanced
Windows Analytics Log Analytics

This will only configure the level of usage data. It will not prevent user modification.

Diagnostic data

Depending on the features used with Windows Analytics, setting the diagnostic data below Enhanced will limit capabilities like Device Health.

Microsoft recommends Enhanced for Windows 10 1709 or higher for full functionality from Windows Analytics.

For more details about Diagnostic data, see Microsoft Docs.

  • Create a new Device configuration profile
Windows Analytics Log Analytics
  • Specify the name, select Windows 10 and later and select a Custom profile type
Windows Analytics Log Analytics
  • There are multiple OMA-URI settings available for Window Analytics. The first and mandatory OMA-URI is the CommercialID
    • Name : CommercialID
    • OME-URI : ./Vendor/MSFT/DMClient/Provider/MS DM Server/CommercialID
    • Value, type string: <yourCommercialID>
Windows Analytics Log Analytics
  • To disable the ability for the user to change the usage data level, set the following OMA-URI
    • Name : ConfigureTelemetryOptInSettingsUx
    • OME-URI : ./Vendor/MSFT/Policy/Config/System/ConfigureTelemetryOptInSettingsUx
    • Value, type integer : 1
Windows Analytics Log Analytics
  • To prevent user notification when modifying the usage data level, set the following OMA-URI
    • Name : ConfigureTelemetryOptInChangeNotification
    • OMA-URI : ./Vendor/MSFT/Policy/Config/System/ConfigureTelemetryOptInChangeNotification
    • Value type integer : 1
Windows Analytics Log Analytics
  • Other possible configurations are related to GDPR for EU company.
    • Name : LimitEnhancedDiagnosticDataWindowsAnalytics
    • OMA-URI: ./Vendor/MSFT/Policy/Config/System/LimitEnhancedDiagnosticDataWindowsAnalytics
    • Value type integer : 1
  • And..
    • Name : AllowDeviceNameInDiagnosticData
    • OMA-URI: ./Vendor/MSFT/Policy/Config/System/AllowDeviceNameInDiagnosticData
    • Value type integer: 1
    • Be aware that this setting, if disabled, will provide limited data analysis from Update compliance and device health because of the computer name not available.

Configure data collection for Windows Analytics with GPO

As covered in the Intune section, the same settings are available in the GPO. They can be found under Computer Configuration/Administration Templates/Windows Components/Data Collection and Preview build.

Make sure to use the latest ADMX for the most up to date options.

Windows Analytics Log Analytics

For more details about the various settings, see Microsoft Docs

Enable client for Windows Analytics with SCCM

If you are using SCCM, the Commercial ID can be specified in the Client settings. This is by far the easiest method of all. Otherwise, this option is limited as more configuration is available by GPO and Intune

Windows Analytics Log Analytics

For more details about Windows analytics, see Microsoft docs

[ratings]

Share this Post

The post How to configure Windows Analytics with Log Analytics appeared first on System Center Dudes.


How to configure Delivery Optimization with Intune

$
0
0

Microsoft has been hard at work to optimize content delivery since the release of Windows 10 and Office 365. While not perfect at the beginning, the offer is now really great and offer many supported methods to ease the huge content that needs to be distributed month after month. Delivery Optimization is a key component included in Windows 10 since the beginning and recently added to Office 365. Combining Delivery Optimization Intune with Windows update for business will greatly help content download from the Internet.

In this post, we will provide details to configure Delivery Optimization for Windows 10 and Office 365, by using Microsoft Intune.

This post is part of a series on Windows Autopilot that will be published in the following weeks. In the next posts, we will cover the following subjects :

What is Delivery Optimization?

Delivery Optimization is a built-in service of Windows 10, and now Office 365, that allows computers under the same network to share downloaded content for monthly updates and bi-yearly upgrades of Windows 10 and Office 365 in a form of peer-to-peer.

The main benefit of Delivery Optimization is to avoid the trouble of managing the downloads of updates to an offline source, like Configuration Manager/WSUS, by allowing Windows 10 clients to download updates directly from Windows Update sources. It then shares it to nearby computers in the desired behavior to prevent overloading the network (LAN and/or WAN).

Whenever Windows Update for Business is used to manage updates, or simply if computers aren’t managed for updates, Delivery Optimization should be put in place to help with bandwidth management.

Delivery Optimization Intune Requirements

For Windows 10

  • All versions of Windows 10 support Delivery Optimization, but 1709 or higher should be used since there were key improvements over the years.

For Office 365

  • Updates must come from Office Content delivery network(CDN)
    • This means not from ConfigMgr or a shared network
  • One of the following must be met:
    • Version 1808 or higher for background updates
    • Version 1908 or higher for installation or user-initiated updates

Configure Delivery Optimization Intune for Windows 10

In the early days of Windows Update for Business, Delivery optimization was configurable within a ring configuration for Windows Update for Business. As seen below, this has been moved to standard device configuration.

Delivery Optimization Intune

To configure delivery optimization for Windows 10, create a new Device Configuration

  • Open the Device Management portal for Intune and click on Devices/Configuration Profiles and select Create Profile
Delivery Optimization Intune
  • Give a name, select platform Windows 10 or later and select profile type Delivery Optimization
Delivery Optimization Intune
  • Next, the detailed configuration can be quite customized for each enterprise.
Delivery Optimization Intune
Download Mode

The most important configuration of Delivery Optimization is Download Mode. This will define how clients will download and share content with others on the network. A bad configuration could kill LAN or WAN connection. There is no definitive answer as to which you should use.

Delivery Optimization Intune

If your enterprise as multiple offices with single NAT per office, then LAN(1) should do the trick. This will allow all computers under that unique NAT to share the content. But on the other hand, if you have a unique NAT for multiple offices, using this option will likely take a lot of bandwidth between your offices when dealing with large updates/upgrades.

The option of Groups(2) should also be considered. This allows some granularity and multiple choices to group computers. This will avoid the limitation of the LAN(1) option.

Delivery Optimization Intune

Note that the naming changed a bit between the official docs and choices in Intune. Refer to the number to understand the behaviour.

Delivery Optimization Intune

More details for Download mode available on Microsoft Docs

Other settings can be modified for your needs, without any key recommendations to be followed.

For more details about Windows 10 Delivery optimization, see Microsoft docs.

Configure Delivery Optimization Intune for Office 365

Delivery Optimization Intune
  • Select Configuration Profiles and choose Create Profile
Delivery Optimization Intune
  • Type in a name, Platform Windows 10 or later and select a Profile Type Custom
Delivery Optimization Intune
  • Provide the following information:
    • Name: ADMX Install
    • OMA-URI: ./Vendor/MSFT/Policy/ConfigOperations/ADMXInstall/CustomOfficeDOSettings/Policy/CustomOfficeDOSettings
    • Data type: string
    • Value:
<policyDefinitions revision="1.0" schemaVersion="1.0" xmlns:xsd="http://www.w3.org/2001/XMLSchema" xmlns:xsi="http://www.w3.org/2001/XMLSchema-instance">
    <policyNamespaces>
        <target prefix="Custom" namespace="Custom.Microsoft.Policies.Windows"/>
        <using prefix="windows" namespace="Microsoft.Policies.Windows"/>
    </policyNamespaces>
    <resources minRequiredRevision="1.0" fallbackCulture="en-us"/>
    <categories>
        <category name="CustomOfficeDOSettings" displayName="Custom Office DO Settings" explainText="https://docs.microsoft.com/en-us/DeployOffice/delivery-optimization">
            <parentCategory ref="windows:Custom" />
        </category>
    </categories>
    <policies>
        <policy name="SetDOAsPrimary" displayName="SetDOAsPrimary" explainText="https://docs.microsoft.com/en-us/DeployOffice/delivery-optimization" key="SOFTWARE\Policies\Microsoft\office\16.0\common\officeupdate" class="Machine" valueName="SetDOAsPrimary">
            <parentCategory ref="CustomOfficeDOSettings"/>
            <supportedOn ref="windows:SUPPORTED_Windows7" />
            <enabledValue>
                <decimal value="1" />
            </enabledValue>
            <disabledValue>
                <decimal value="0" />
            </disabledValue>
        </policy>
    </policies>
</policyDefinitions>
Delivery Optimization Intune
  • Name: SetDOAsPrimary
  • OMA-URI: ./Device/Vendor/MSFT/Policy/Config/CustomOfficeDOSettings~Policy~CustomOfficeDOSettings/SetDOAsPrimary
  • Data Type: string
  • Value: <enabled/>
Delivery Optimization Intune
  • The end result should look like this
Delivery Optimization Intune
  • Assign the configuration profiles to devices and voila

There is another option that is provided from Michael Neihaus blog, to use a custom ADMX to configure this same setting.

For more details about Office 365 Delivery optimization, see Microsoft docs

Validation of Delivery Optimization usage

Before looking for actual facts that DO is working correctly, a validation of your GPO might be a good idea. Many enterprises did change the behavior of Delivery Optimization because of the early days of the technology. Make sure to remove any GPO that manage Delivery Optimization.

Delivery Optimization Intune

Getting data usage of Delivery optimization takes time. Without monthly updates or major upgrades, not much will happen. But once it gets going, numbers are pretty crazy!

Under Windows Analytics – Update Compliance, there is a dedicated section for Delivery Optimization.

Delivery Optimization Intune

A picture speaks for itself!

Delivery Optimization Intune

The following post from Narkis Engler, from Microsoft, is excellent to resume benefits and methods to review Delivery Optimization.

Share this Post

The post How to configure Delivery Optimization with Intune appeared first on System Center Dudes.

How to use Windows Update for Business with Intune

$
0
0

Windows Update for Business is one of the new things Microsoft proposed along with Windows 10. It has come a long way since it’s release. Even if it isn’t perfect yet, or give all the flexibility that ConfigMgr (MEMCM) offer when managing monthly update or feature release, for many small/medium business, this brings a more simple approach to patching and maintaining Windows 10 up to date. In this post, we will detail how to configure Intune Windows Update for Business to patch Windows 10 devices managed by Intune

Pre-requisites

  • Windows 10 must be managed by Intune
    • If Windows 10 is being co-managed with ConfigMgr(MEMCM), make sure the slider for Software Update is set to Intune

Intune Windows Update Business – Update rings strategy

Depending on multiple factors, the key for Windows Update for Business to be successful is to define the various update rings for your enterprise.

Here, no magic answer or one size fit all scenarios.

To take in consideration to build your strategy :

  • Number of users total/per rings
  • Risk tolerance for the Feature update release
  • Windows 10 Pro vs Enterprise
    • Pro only allows 18months support following the release date of a build. Feature update strategy is likely to be more aggressive than if Windows 10 Enterprise is used with its 30months policy for autumn releases.

What we usually recommend :

  • Minimum of 3 Update rings
    • Test, with a few IT people only
    • Pilot, with more IT people and users for many department/roles
    • Production, with everyone else.
      • Depending on the total amount of user and support capacity, consider multiple Prod rings to avoid too many users at once installing Feature Update
  • The monthly quality update can follow the same 3 major Update rings
    • Test, within the first few days of release
    • Pilot, within a week or so of the release
    • Prod, within 2-3 weeks after release
    • Remember, it’s not possible to deny a monthly update. So better be careful and avoid faulty updates for most of the users
  • Servicing channel for most if not all should be Semi-Annual channel
  • Carefully review User experience settings in the update ring. Find the best fit for your users along with security needs.

Here’s an example of an aggressive update rings configuration.

Create Windows 10 Update rings

Intune Windows Update Business
  • Click on Create profile
  • Provide a name
  • Configure the Update Ring settings
Intune Windows Update Business
Update ring settings

Lots of stuff in this screen.

Key points are Deferrals for both monthly and Feature updates.

Other settings are mostly about User Experience, so this needs to be reviewed case by case.

  • Set scopes tags if needed
  • Set the Assignments. Interesting point here is that you can target groups of users, which in the long run is a much easier way to target test and pilot users without care about the device anymore.
  • Review
Intune Windows Update Business

Monitor Windows Update for Business

This is still done with the Update Compliance from Windows Analytics. Note that this is the only component that hasn’t retired yet.

  • Follow our post to configure Update Compliance
  • Once configured, reporting will take a bit of time. After a few days, it will look like this
  • It is possible to see the progress of both Monthly updates and Features updates.

For more details about Update Compliance, see Microsoft docs

Additional steps

When using Windows Update for Business, Delivery Optimization should be reviewed for better network effecianty.

Follow our post to enable Delivery Optimization for Windows 10 update/upgrades and Office 365 updates

Intune Windows Update Business

There is also a new option Windows 10 feature Update that is currently in preview. This allow administrators to select the Feature update to target instead of leaving it only by default.

Intune Windows Update Business

For more details about Windows Update for Business, see Microsoft docs

Share this Post

The post How to use Windows Update for Business with Intune appeared first on System Center Dudes.

Monitor SCCM Task Sequence Progress

$
0
0

When deploying Windows 10 operating system using SCCM (OSD), you will need to monitor SCCM task sequence progress. This allows us to track task sequence start, end time and most importantly errors (if any).

Our post will show 4 different ways to monitor SCCM task sequences. Each of them has its own benefits and drawbacks.

Monitor SCCM Task Sequence Using the Console

You can view the progress of a task sequence using the SCCM console. This method is simple and easy but permit to see the status of only one machine at the time. If your deployment staff don’t have access to the console or view deployment status, this option is not for you.

  • Open the SCCM Console
  • Go to Monitoring / Deployments
  • Search and right-click the deployment linked to your Windows 10 task sequence
  • On the menu, select View Status
Monitor SCCM Task Sequence
  • In the Deployment Status screen, select the In Progress tab for a running task sequence or the Success tab to review a completed task sequence
  • At the bottom, click the Asset Details pane, right-click your device and select More Details
Monitor SCCM Task Sequence
  • On the Asset Message screen, click the Status tab
  • You can view all task sequence Action Name with their Last Message Name
Monitor SCCM Task Sequence

Console Status Message Queries

You can use Status Message Queries in the SCCM console to filter only task sequence messages. This method is useful to have messages from multiple devices instead of targeting a specific computer like in the previous methods. This method is a bit trickier to implement.

  • The first step is to get the DeploymentID of your task sequence deployment
  • Go to Monitoring / Deployments
  • Add the DeploymentID column by right-clicking the top row. Note your DeploymentID, in our example 1002000B
Monitor SCCM Task Sequence
  • Go to Monitoring / System Status / Status Message Queries
  • Right-click Status Message Queries and select Create Status Message Query
Monitor SCCM Task Sequence
  • On the General tab, enter a desired Name and click on Edit Query Statement
Monitor SCCM Task Sequence
  • On the Query Statement Properties window, click on Show Query Language
Monitor SCCM Task Sequence
  • Enter the following query in the Query Statement window
select
SMS_StatusMessage.*,SMS_StatMsgInsStrings.*,SMS_StatMsgAttributes.*,SMS_StatMsgAttributes.AttributeTime
from SMS_StatusMessage
left join SMS_StatMsgInsStrings on SMS_StatMsgInsStrings.RecordID = SMS_StatusMessage.RecordID
left join SMS_StatMsgAttributes on SMS_StatMsgAttributes.RecordID = SMS_StatusMessage.RecordID
where SMS_StatMsgAttributes.AttributeID = 401 and SMS_StatMsgAttributes.AttributeValue = "1002000B" and SMS_StatMsgAttributes.AttributeTime >= ##PRM:SMS_StatMsgAttributes.AttributeTime##
order by SMS_StatMsgAttributes.AttributeTime DESC
  • Change the SMS_StatMsgAttributes.AttributeValue to reflect your DeploymentID
Monitor SCCM Task Sequence
  • Click OK
  • In the Status Message Queries node, find your newly created Query, right-click on it and select Show Messages
Monitor SCCM Task Sequence
  • Select the desired Date and Time and click OK
  • All messages from your selected deployment will be displayed for all devices that run it
Monitor SCCM Task Sequence

SCCM Built-in Reports

There’s 28 built-in reports concerning task sequence in SCCM. The majority of the reports focus on statistics about overall deployments. To monitor progress, we refer to the 2 following reports :

  • Task Sequence – Deployment Status / Status of a specific task sequence deployment for a specific computer
    • This report shows the status summary of a specific task sequence deployment on a specific computer.
Monitor SCCM Task Sequence
  • Task Sequence – Deployment Status / History of a task sequence deployment on a computer
    • This report displays the status of each step of the specified task sequence deployment on the specified destination computer. If no record is returned, the task sequence has not started on the computer.
 
Monitor SCCM Task Sequence

As you can see, readability is easier using the console but keep in mind that reports can be accessed without having console access.

SCD PowerBi OSD Dashboard

We offer a PowerBi Dashboard for you to buy to keep track of your Windows 10 deployment. The SCCM OSD PowerBi Dashboard gives you detailed information about your current operating system deployment statistics.

You can find the report on our shop or directly on the SCCM Windows 10 Report product page. We offer a 25% discount on this dashboard for you to use. Simply use code OSDMonitor at check out.

SCD SCCM OSD Report

If you’re not using PowerBi yet, we also offer an SSRS report to keep track of your Windows 10 deployment. The report gives you all the information needed to keep track of a deployment. Simple upload the report on your reporting point.

You can find the report on our shop or directly on the SCCM Windows 10 Report product page. We offer a 25% discount on this report for you to use. Simply use code OSDMonitor at check out.

Monitor SCCM task sequences using Community Tools

The ConfigMgr Task Sequence Monitor tool, developed by fellow blogger Trevor Jones, is a GUI application that makes use of the task sequence execution data in the ConfigMgr database to review or monitor ConfigMgr task sequences.  It can report data from historic deployments as well as monitor running ones. It’s been a while since the last update but still a good tool to use.

SMSTS.log

Last method we want to cover to monitor Windows 10 task sequence deployment is using the SMSTS.log file. This is the method you’ll want to use when you have a failing task sequence. The SMSTS.log file contains every details about every steps in your task sequence. It’s the first place to look to troubleshoot a problem with a specific deployment.

The downside of this file is that it’s stored locally on the computer (by default). Another downside is that this file location change depending on the stage you are at :

In Windows PE – Before the hard disk is formattedX:\Windows\Temp\Smstslog\Smsts.log
In Windows PE – After the hard disk is formattedX:\Smstslog\Smsts.log and C:\_SMSTaskSequence\Logs\Smstslog\Smsts.log
In Windows – Before the SCCM client is installedC:\_SMSTaskSequence\Logs\Smstslog\Smsts.log
In Windows – After the SCCM client is installedC:\Windows\Ccm\Logs\Smstslog\Smsts.log
In Windows – When the Task Sequence is completeC:\Windows\Ccm\Logs\Smsts.log
  • Connect on the computer you want to troubleshoot
  • Press the F8 key. A command prompt will open. If you have no command prompt by pressing F8, consult our Preparation post to enable Command Line support in your Boot image
  • In the command windows, enter CMTrace to open the log viewer (it’s included by default in the latest WinPE version)
  • Browse to the location when the file reside (see above table)
  • The SMSTS.log opens and you can search for errors
Monitor SCCM Task Sequence

There’s also methods to redirect your SMSTS.log automatically to a network share which could help :

We hope this post will ease your Windows 10 deployments. Do you have a better alternative to monitor SCCM task sequence ? Leave your comments and suggestions in the comment section.

The post Monitor SCCM Task Sequence Progress appeared first on System Center Dudes.

Collect Windows10 Events in log analytic Workspace

$
0
0

Windows 10, Azure, and Endpoint Manager offer many different tools to gather and know more about what is going on in your environment. One of those is Log Analytics Workspace. Log Analytics workspace has the ability to collect data from Windows devices such as Events and performance data through the Microsoft monitoring agent. This can centralize Windows events to be analyzed and crunched to identify potential impacts happening to many computers.

While the Monitoring agent is free, the data hosted in Log Analytics Workspaces will cost a little per month for great insight. Based on past experience, you can expect ~100$/month for roughly 7000 devices reporting Errors and Warning.

In this post, we will describe how to configure the Azure Log Analytics Workspace to gather Windows10 Events centrally.

Windows10 Events log analytic – Prerequisites

  • The following operating systems are supported to report event viewer by using the Log Analytics agent
    • Windows 7, 8 and 10
    • Windows Server 2008 SP2 and above
  • Clients communicate to the Azure Monitor service over TCP 443

For mode details about the requirements, see Microsoft Docs

Create a Log Analytics Workspace

  • Open the Azure portal and search for Log Analytics Workspaces
  • Click on Add
Windows10 Events log analytic
  • Select the subscription that the usage of Log Analytics Workspaces will be billed to. Specify a name for the instance name and select the region that it will be hosted to
Windows10 Events log analytic
  • Select the Pricing tier. This will vary depending on your contract with Microsoft.
  • Specify Tags if you wish so.
Windows10 Events log analytic
  • Review final validation and create the Log Analytics workspace
Windows10 Events log analytic
  • The Log Analytics workspace will be created within seconds.

Configuring Windows Event logs

  • From the overview page of the newly created Log Analytics Workspaces, select the Resource just created
Event viewer log analytic
  • Select Advanced Settings
Event viewer log analytic
  • Under Data/Windows Event Logs, we need to add the events we wish to collect.
    • Simply type in the Events you wish to monitor, for example System, Application or Setup.
Windows 10 events Log Analytics
Careful what is selected

In most cases, avoid selecting Information since there are way too many information events generated per computer. This would have an impact on the cost associated with Log Analytics Workspace.

For some more specific event categories, Information may make sense, depending on what you are looking for.

Event viewer log analytic
  • Once the list is completed, click Save

Download the Monitoring Agent

  • In the workspace details, select Agent Management
Event viewer log analytic
  • Download the Windows Agent based on the OS architecture needed
Event viewer log analytic
  • Take note of the Workspace ID and Primary Key. They both will be required at the install time.
Important Info

If some computers do not have direct internet connection, and you still need to have events centralized, it is possible to configure a Log Analytics Gateway.

Windows 10 events Log Analytics

See Microsoft docs for more details

Install the Monitoring agent

The Monitoring agent can be installed manually or silently using an install command. Endpoint Manager or Configuration Manager can easily deploy this agent with the command line.

  • When ran manually, the Workspace ID and Primary key will be asked within the install wizard
  • To create a silent install, the setup.exe must first be extracted from the downloaded installer
  • From a command prompt, use the following command to extract the content
    • MMASetup-AMD64.exe /c
    • a prompt will show to set the location
  • The silent install command line should look like this
setup.exe /qn NOAPM=1 ADD_OPINSIGHTS_WORKSPACE=1 OPINSIGHTS_WORKSPACE_AZURE_CLOUD_TYPE=0 OPINSIGHTS_WORKSPACE_ID="<WorkspaceID>" OPINSIGHTS_WORKSPACE_KEY="<Workspace Key>" AcceptEndUserLicenseAgreement=1
  • Workspace ID and Workspace Key need to be specified.

For more details about the installation of the Monitoring agent, see Microsoft docs

Verify Agent communication

  • On a computer that the Monitoring agent is installed, go to Control Panel, and select Microsoft Monitoring Agent
Windows 10 events Log Analytics
  • On the tab Azure Log Analytics, the status of the agent is reported.
Windows 10 events Log Analytics
  • After a few hours, the events will be available in Log Analytics workspaces.

How to view centralized Windows events

  • In the Log Analytics Workspace, select Logs
Windows 10 events viewer Log Analytics
  • From there, queries can be made. While the query language isn’t intuitive, after a few queries, details can be sorted about the Windows events happening in your environment.

For more details about Log Analytics query language, see Microsoft Docs

Log Analytics query examples

Here’s a few example of queries for Windows10 Events log analytic

To list all events for a specific computer

Event | where  Computer  == "<computer name>"
Event viewer log analytic

To list all events returned by all computers

Event
Windows10 Events log analytic

To list counts of Errors in the System events

Event | where EventLog == "System" | where EventLevelName == "Error" | summarize count() by Source, EventID
Windows10 Events log analytic

Counts of specific event ID per computers

Event | where EventID == 5002 and EventLevelName == "Error" | summarize Event_Count=count() by Computer | sort by Event_Count
Windows10 Events log analytic

Counts of errors per day for all computers

Notice that you can use chart for easily pinpoint bad days. It is also possible to modify the Time Range for bigger overview. In the below example, digging what happened on September 9th would make sense since the number of errors globally was way higher then usual.

Event | where EventLog == "System" | where EventLevelName == "Error" | summarize events_count=count() by startofday(TimeGenerated) | sort by TimeGenerated asc nulls last
Windows10 Events log analytic

For more details about Log analytics agent, see Microsoft docs

The post Collect Windows10 Events in log analytic Workspace appeared first on System Center Dudes.

How to send SetupDiag Result in your SCCM Inventory during a Windows 10 Feature Update

$
0
0

Windows 10 Feature updates can be tricky for many reasons. Fellow SC Dudes, Adam Gross, created a free and easy-to-implement solution to help debug and track down Feature Update logs.

This solution, along with our previous post to track down Windows 10 Feature Update hard blocks, will greatly ease Windows 10 Servicing.

Windows 10 SetupDiag SCCM Inventory Benefits

  • Centralized log for any on-prem Feature Update attempt
  • SetupDiag details stored in Hardware Inventory, which can be monitored by SQL query/reports and PowerBI

While we recommend sticking to Feature Update to deliver new Windows 10 builds, this solution will work the exact same if a Task Sequence is used to do an upgrade.

In this post, we’ll detail how to implement the Windows 10 Feature Update script to include it in your SCCM Inventory. This should help you with Feature update failures by identifying errors easily.

Requirements

We will now prepare our environment by downloading the script from Github and store it locally.

Important Info

Microsoft has recently announced that SetupDiag will now be included in Windows 10 2004 and up.

While this is good news, the current setup provided here can remain valid or could be modified to match this.

MEMCM 2010 was just released and some analysis from SetupDiag is now included. Again, this requires Windows 10 2004 or higher to work. See Microsoft docs for more details.

Windows 10 SetupDiag SCCM Inventory
  • Extract the content of the ZIP to a short path, like C:\temp\ for example
Windows 10 SetupDiag SCCM Inventory

Configure the script for your environment

Now that the script is downloaded, we must edit it to include our server information :

  • Edit SetupFUFramework.ps1 and modify the following section
    • Set the following variables to match your environment
    • $SiteCode
    • $SiteServer
    • $ApplicationFolderName
    • $ApplicationSourceRoot
    • $NetworkLogPath
      • This will be used to centrally store logs following a feature update.
      • This needs to be a simple share that domain-joined devices can write to it.
  • Optional. Modify those value, has those will define the ConfigMgr Application, and local path used by the various scripts.
  • Add SetupDiag.exe to the Content/Scripts path.
Windows 10 SetupDiag SCCM Inventory
  • Optional – All this can be done at the command line to launch the script
.\SetupFUFramework -SiteCode "PS1" -SiteServer "CM01.ASD.NET" -ApplicationFolderName "FUApplication" -ApplicationSourceRoot "\\CM01.ASD.NET\Media\$($ApplicationFolderName)" -NetworkLogPath "\\CM01.ASD.NET\FeatureUpdateLogs"

Execute the SetupFUFramework script

All the magic resides in Adam’s script. We will now run the script to create the application and CI on your SCCM Server. Everything will be done automatically:

  • Open a PowerShell command windows as a MEMCM admin
  • Navigate to the script location and run it :
Windows 10 SetupDiag SCCM Inventory
  • The script will create the following:
    • An application named Feature Update – Client Content
  • A set of Configuration Items under a Feature update folder
  • A set of Configuration Baselines under a Feature Updates folder

Modify the Feature Update – SetupDiag version CI

  • Edit the Feature Update – SetupDiag Version configuration baseline item. Select Properties
  • Under Compliance select New
Windows 10 SetupDiag SCCM Inventory
  • Select Feature Update – SetupDiag Version
  • Set the following:
    • Rule Type: Value
    • Property: File Version
    • the value must match the version of SetupDiag downloaded
    • Set Noncompliance to critical
Windows 10 SetupDiag SCCM Inventory

Modify Hardware Inventory

For added value, the hardware inventory must be modified with 2 Custom MOF to be imported. This will allows showing the SetupDiag results in your SCCM Compliance or hardware inventory reports.

  • Go to Administration/Clients settings, and edit the Default Client settings.
  • Under Hardware Inventory, select Set Classes
Windows 10 SetupDiag SCCM Inventory
  • Select Import
Windows 10 SetupDiag SCCM Inventory
  • Select one of the 2 MOF to be imported. They are in the extracted folder\MOF
  • Once imported, repeat steps for the second MOF file.
Windows 10 SetupDiag SCCM Inventory
  • Once done, they can be check/unchecked if you prefer to test it in custom Client settings prior to rollout to production

Deployments

Once all this is in place, the following components must be deployed on your clients:

  • Feature Update – Client Content application, to stage SetupDiag
  • Configuration Baselines, to report back compliance
    • This could then become hard requirements before initiating a Feature Update
  • Client settings for the hardware inventory

Results

With everything in place, Feature Update can be initiated. Once ran, the following should be available.

  • Under the resource explorer of a device, the details from the Feature update is available. Reminder, this is based of the Hardware inventory cycle!
Windows 10 SetupDiag SCCM Inventory
  • Logs were copied to a central share .
”Watch
  • You can also run the included PowerBI report to see the results
Windows 10 SetupDiag SCCM Inventory

Additional notes

The SetupConfig.ini is key for Windows 10 Feature Update. it drives multiple behaviors. Adam wrote a great post about this. It can be edited under the Configuration item, Feature Update – SetupConfig.ini.

We hope this Windows 10 SetupDiag SCCM Inventory post was helpful ! Let us know in the comment section if you’re using it.

The post How to send SetupDiag Result in your SCCM Inventory during a Windows 10 Feature Update appeared first on System Center Dudes.

How to Enable and Monitor SCCM BranchCache

$
0
0

In this post, we will cover how to configure BranchCache on your SCCM server SCCM clients. It’s quite straight forward and using BranchCache can significantly optimize network bandwidth during deployment.

BranchCache is a bandwidth-optimization feature introduce with Windows Server 2008 R2 and Windows 7. Each client uses a cache and acts as an alternate source for content that devices on its own network request. SCCM can use BranchCache to optimize network bandwidth during deployments. That way you decrease your request on your distribution points since your client act as the source for other clients.

We won’t go into detail on all different SCCM Caching methods, this blog focus on enabling BranchCache but we suggest that you get familiar with the different caching options that are available.

Microsoft has an excellent article for Selecting the right peer caching technology and a great comparison post between BranchCache and Peer Cache. You can read both articles to know more about the different options that are available.

There are 2 settings to enable BranchCache on your SCCM Server. One on the server-side and one on the client-side. For our post, we are using an SCCM 2103. Be sure to update your site if some options are not available for you.

Configure SCCM BranchCache server

On your SCCM Site, the BranchCache option is on the Distribution Point site system.

  • Go to Administration / Site Configuration / Servers and Site System Roles
  • At the bottom, right-click your Distribution Point and select Properties
  • In the General tab, select Enable and configure BranchCache for this Distribution Point
SCCM BranchCache

Configure SCCM client settings for BranchCache

For the clients, enable Branch Cache in your Client Settings. This is great to target only needed device. You can deploy this client setting only to machine that needs it.

  • Go to Administration / Client Setting / Client Cache Settings
  • Set the dropdown Enable BranchCache to Yes
  • Set the dropdown Configure BranchCache to Yes
  • Set the desired option for cache size
  • Deploy the client setting to the desired devices
SCCM BranchCache

How to validate SCCM BranchCache

On a client that receive the configured client settings. Update the machine policy. And run the following command

netsh branchcache show status all

On a successfull client you’ll see statistics about BranchCache :

You can also see the Active Current Cache size on the machine after you start using it. If you just enabled SCCM BranchCache, it will be at zero.

SCCM BranchCache

On a device that haven’t received the Client Setting you’ll see this when running the same command :

SCCM BranchCache

Deploy content and test SCCM BranchCache

Requirements

  • 2 Windows clients under the same boundary and using the same Distribution Point with BranchCache enabled
  • Deploy a package or application with an available deployment. Try using a package or application with at least 100MB of data.
  • For SCCM 1802+ you don’t have to enable anything on the deployment level anymore, it’s simply not needed.
  • Prior to 1802, you would need to enable BranchCache option in the deployment properties. This option is enabled by checking the Allow client to Share content with other clients on the same subnet checkbox.
SCCM BranchCache

On your 2 clients

We will now test that both clients are sharing their content for a deployment

  • Run the available deployment from the Software Center
  • Open a command prompt and run the command : netsh branchcache show status all
  • You should see the Cache Size increase
SCCM BranchCache

How to monitor SCCM BranchCache usage

To be able to monitor BranchCache usage, SCCM must be running version 1610 or higher. On a SCCM 2103+ site, the feature is enabled by default.

  • Go to Monitoring \Distribution Status \ Client Data Sources
  • The data will not be available right away if you just enabled BranchCache on SCCM clients. It take about a day to receive information.
  • Once you have data, you’ll be able to see BranchCache Statistics
SCCM BranchCache

SCCM BranchCache Reports

We also have developped a free PowerBi dashboard to monitor your Client Data Source. Check it out of you need more detailed reporting than the one included in the SCCM Console. It can also provide historical data on your deployments. You just have to download it and run it on your server.

SCCM BranchCache
SCCM BranchCache

BranchCache Advance Monitoring

It’s also possible to check live data transfer using Performance Monitor on a client that host SCCM BranchCache content :

  • Launch Performance Monitor from the Start Menu
  • Create a new User Defined / Data Collector Set using the following options :
  • Click on ADD and select both BranchCache options :
  • Save the data to your desired folder and Save it
  • Start and stop the Performance Counter using the green arrow and stop button at the top
  • You can vizualise the data under Reports / User Defined / BranchCache

This is pretty much everything you need to know about SCCM BranchCache. Let us know your experience using the comment section below.

The post How to Enable and Monitor SCCM BranchCache appeared first on System Center Dudes.

How to fix Azure Update Compliance missing devices

$
0
0

Azure Update Compliance has been around for a few years already. Originally part of Windows Analytics, it’s the only component that lived through the years. It has become more popular with the growing number of devices managed with Windows Update for Business. It is also useful for an environment that manages updates and feature updates with Configuration Manager. In this post, we’ll cover how to make the required change so devices report back to Azure Update Compliance.

I recently did a check for a few clients and noticed that the number of devices in Update Compliance was drastically low or even almost empty in some environments. This is because of a change from Microsoft, that was enforced back in January 2022.

Since devices were managed prior to May 2021, we need to adjust the configurations to fix Azure Update Compliance missing devices.

If you are looking for how to use Windows Update for Business with Intune, see our previous blog post.

If you are looking for how to configure Update compliance, see our previous blog post.

How to fix Azure Update Compliance missing devices

There are 3 options to set the required configuration to allow devices to report to Update compliance :

  • Rerun the Update compliance configuration script
  • Use a configuration profile in Microsoft Endpoint Manager
  • Manually configure devices for Update compliance, by using GPO
    • See Microsoft Docs for details about the GPO settings.
    • This isn’t the preferred method, but might still be useful in some environment

Find the Commercial ID

To find your CommercialID :

  • Go to the Solutions tab under the Log Analytics Workspace used for Update Compliance
  • Select the WaaSUpdateInsight
  • Under UpdateComplianceSettings
Azure Update Compliance missing devices

Rerun the Update Compliance configuration script

Here are the key points to using the onboarding script.

  • Once downloaded, edit the following component of the script.
    • Set the CommercialIDValue to your custom ID.
Azure Update Compliance missing devices
  • Once edited, push the script to your devices using your preferred method.

Use Configuration Profile in Microsoft Endpoint Manager

This method can be used on top of the configuration script or standalone.

  • Open the Endpoint Manager portal
  • Go to Devices/Configuration Profile and select Create profile
  • Select the following
    • Platform: Windows 10 or Later
    • Profile Type: Template
    • Template name: Custom
Azure Update Compliance missing devices
  • Set the name of the Configuration Profile
Azure Update Compliance missing devices
  • Set the minimum required OMA-URI settings
    • Name: Commercial ID
      • OMA-URI: ./Vendor/MSFT/DMClient/Provider/ProviderID/CommercialID
      • Data type: String
      • Value: Your Commercial ID
    • Name: Allow Telemetry
      • OMA-URI: ./Vendor/MSFT/Policy/Config/System/AllowTelemetry
      • Data type: Integer
      • Value: 1 (all that is required is 1, but it can be safely set to a higher value).
    • Name: Allow device name in Diagnostic Data
      • OMA-URI: ./Vendor/MSFT/Policy/Config/System/AllowDeviceNameInDiagnosticData
      • Data type: Integer
      • Value: 1
    • Name: Allow Update Compliance Processing
      • OMA-URI: ./Vendor/MSFT/Policy/Config/System/AllowUpdateComplianceProcessing
      • Data type: Integer
      • Value: 16
      • Note: This is the new settings highlighted earlier.
  • Assign the newly created configuration to the desired group
  • For more details about the OMA-URI settings, see Microsoft docs

Conclusion

Once either the script, the GPO, or the Configuration profile is applied, Update compliance data will start populating again. Patience is key, it took a few days before resuming.

You know know how to Fix Azure Update Compliance missing devices

See Microsoft docs for more details about Update compliance

The post How to fix Azure Update Compliance missing devices appeared first on System Center Dudes.


Deploy SCCM Wifi Profiles with Password to Windows 10 Devices

$
0
0

Introduced since SCCM 2012 R2, SCCM Wifi profiles are used to send Wifi configurations to clients. It can be useful if your company is not using certificates or any automated authentication methods. A smaller organization that uses a simple WPA2 setup can use SCCM Wifi profiles to send Wifi SSID and password so that the computers connect automatically to that network.

You can also use Wifi profile to manage mobile devices with Intune but we won’t cover this scenario in this post.

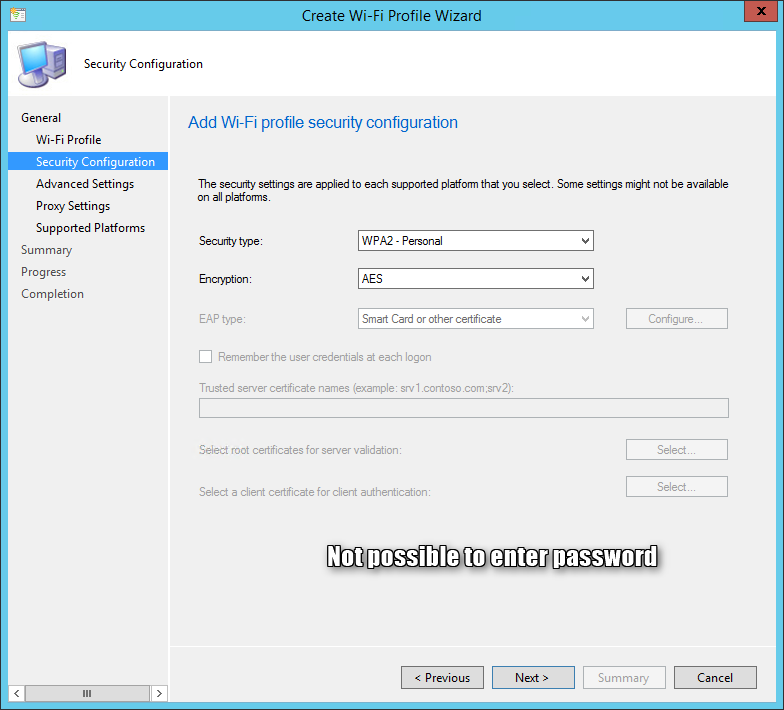
The major drawback of the SCCM Wifi Profile is that it’s impossible to enter the Wifi password using the console UI. (Even in the newest versions). We will show you how to deploy Wifi profiles on a Windows 10 or Windows 8.1 computer, including the Wifi password using an XML file.

SCCM Wifi Profiles

How to deploy SCCM Wifi Profiles with password to Windows 10 devices

Since it’s not possible to enter a password in the SCCM console, we’ll create an XML file and use it to create an SCCM Wifi profile based on this file.

The first step is to connect on a Windows 10 computer and connect to the desired Wifi network manually. You can disconnect once done, it’s only important to connect to the network at least once.

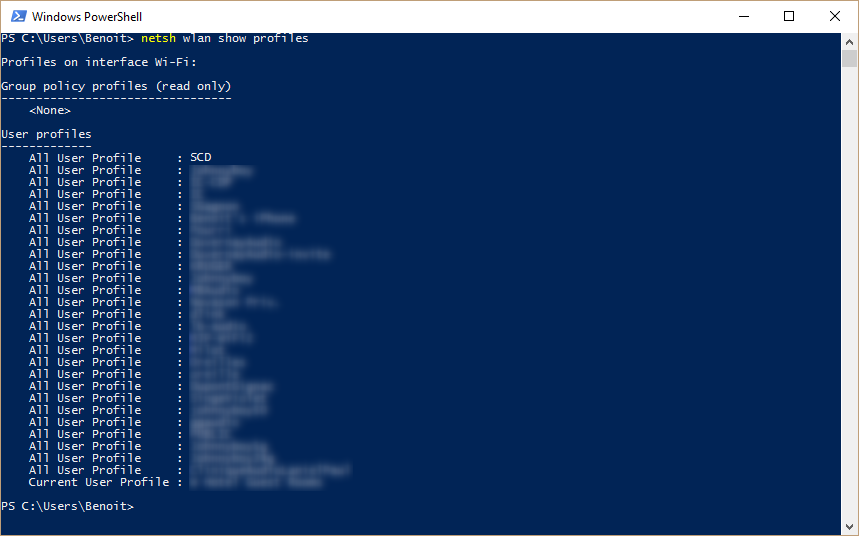
  • Open a PowerShell window and enter the following command to list all Wifi profiles on the computer :

netsh wlan show profiles

  • Enter the following command to create the XML file : (replace the name of your network and location you want the file to be created)

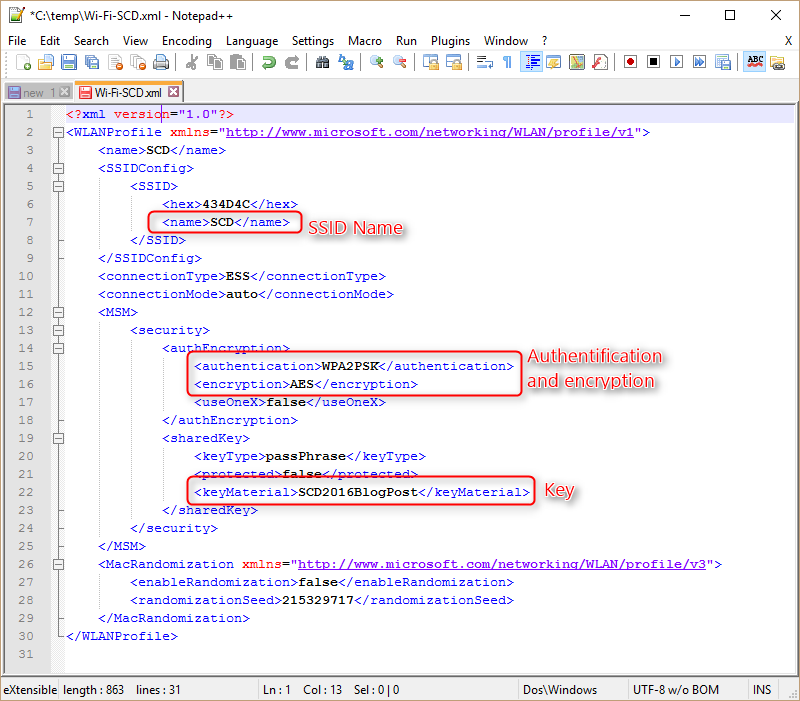
netsh wlan export profile name=”SCD” key=clear folder=c:\temp

SCCM Wifi Profiles
  • Using any text editor, you can see the Wifi information including the WPA2 pre-shared key
SCCM Wifi Profiles
  • We are now ready to create the Wifi profile in the SCCM console using this XML file
  • Open the SCCM console
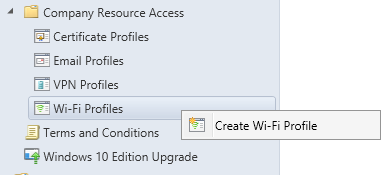
  • Go to Assets and Compliance / Compliance Settings / Company Resource Access / Wi-Fi Profiles
  • Right-click Wi-Fi Profiles and select Create Wi-Fi Profile
SCCM Wifi Profiles
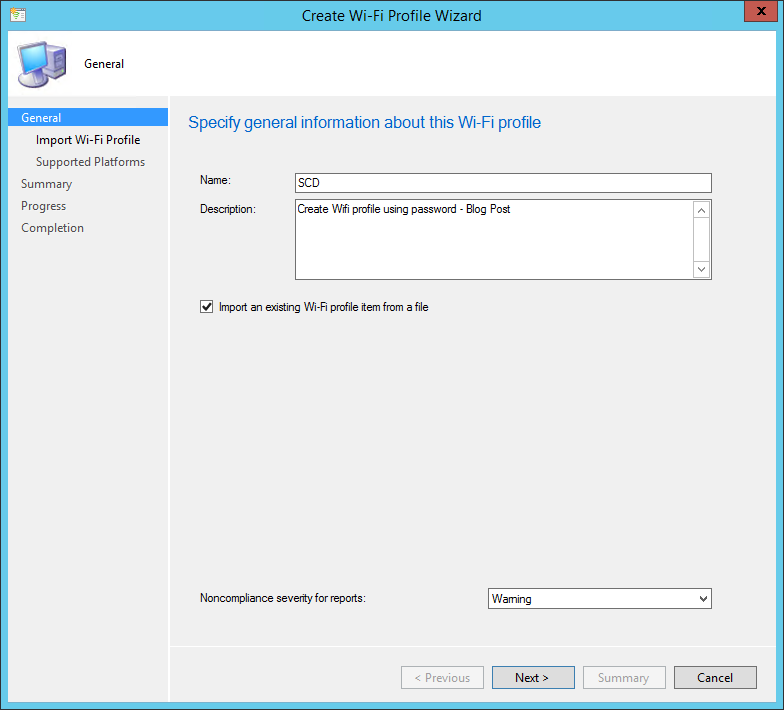
  • On the General pane, enter a Name and Description
  • Check the box Import an existing Wi-Fi profile item from a file, click Next
SCCM Wifi Profiles
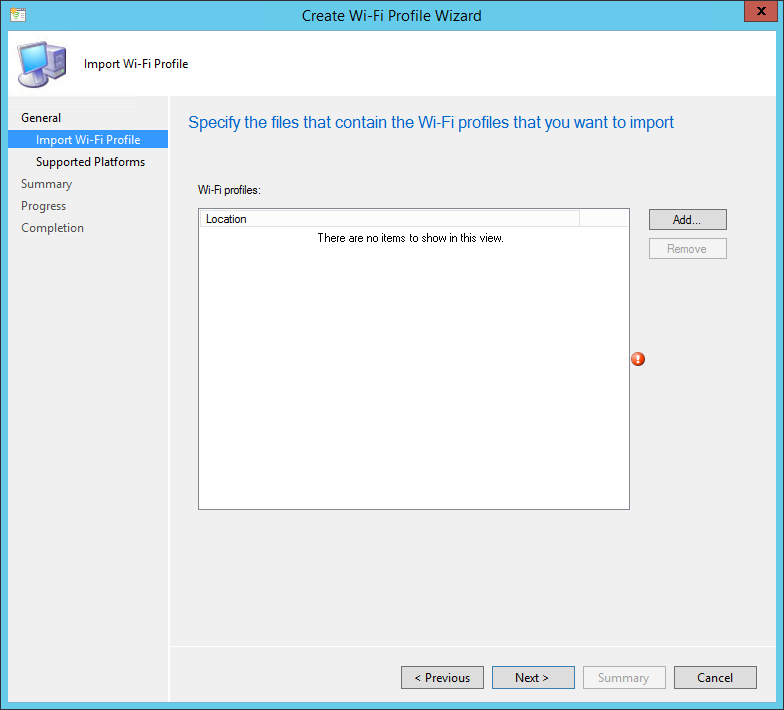
  • On the Import Wi-fi Profile pane, click Add
SCCM Wifi Profiles
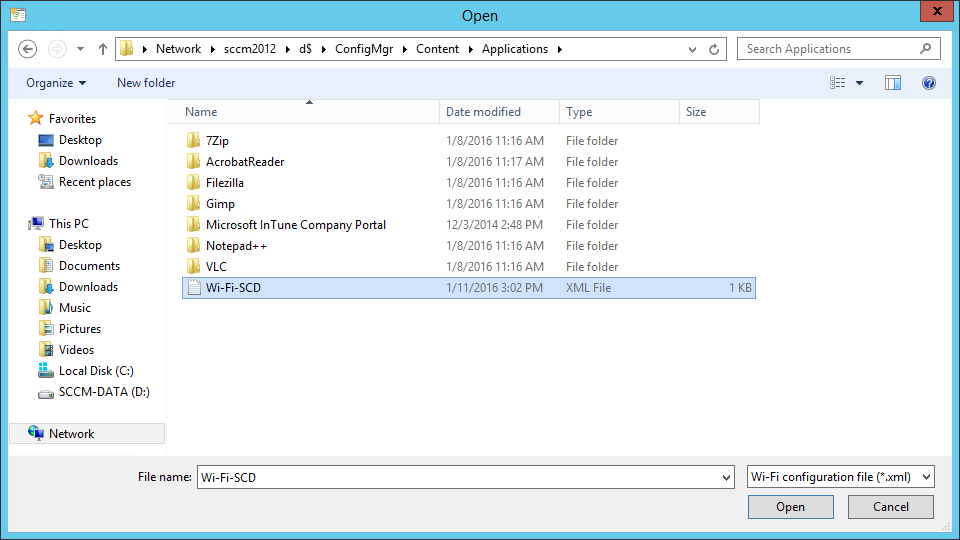
  • Browse to the location where you saved the XML file created in the first step of this post, click Open
SCCM Wifi Profiles
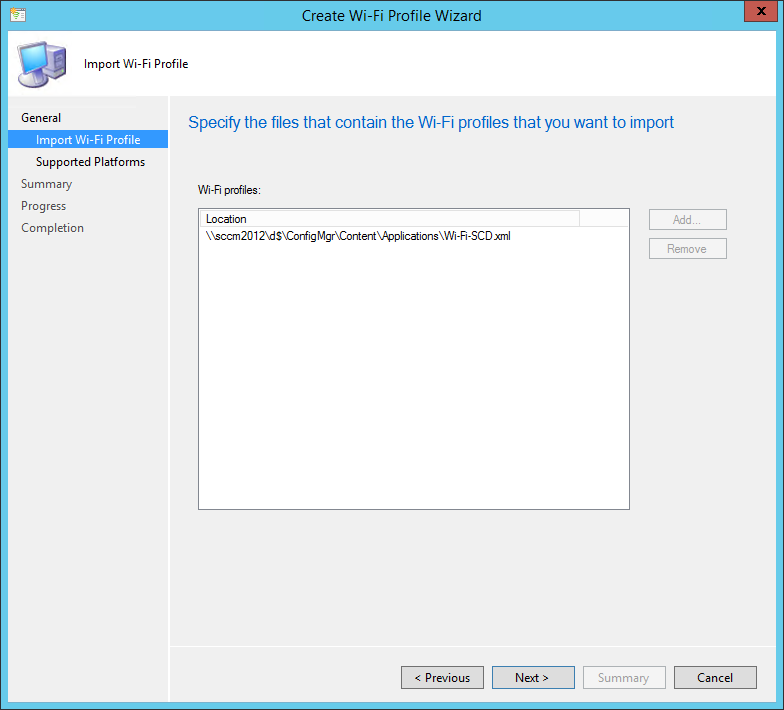
  • Validate the file, click Next
SCCM Wifi Profiles
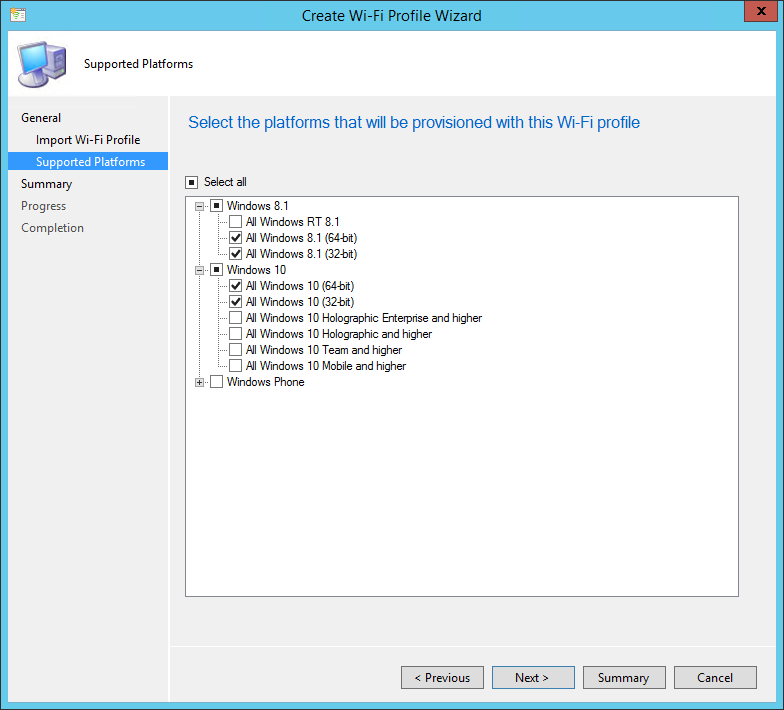
  • On the Supported Platforms pane, select All Windows 8.1 (64-bits), All Windows 8.1 (32-bits), All Windows 10 (64-bits) and All Windows 10 (32-bits), click Next
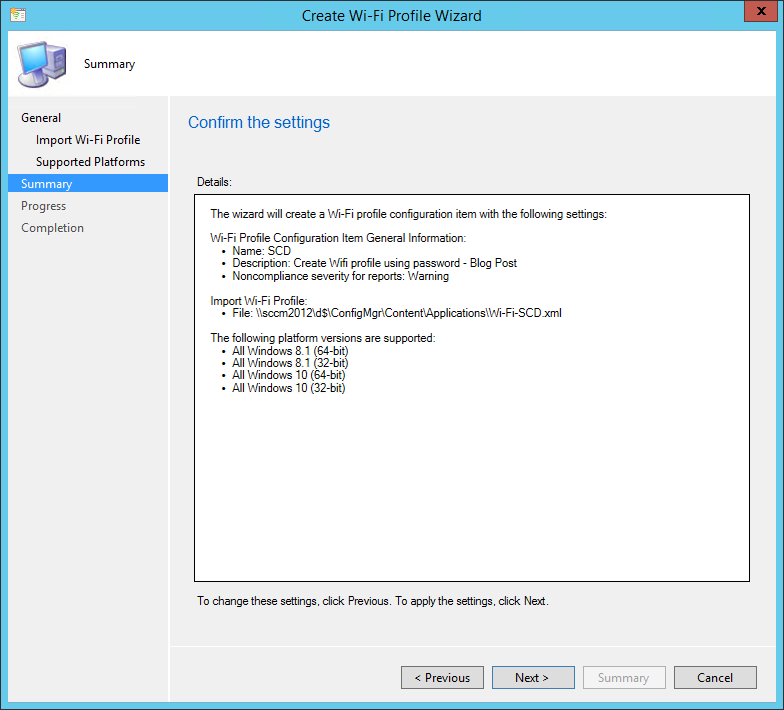
  • On the Summary pane, review your settings and click Next
SCCM Wifi Profiles
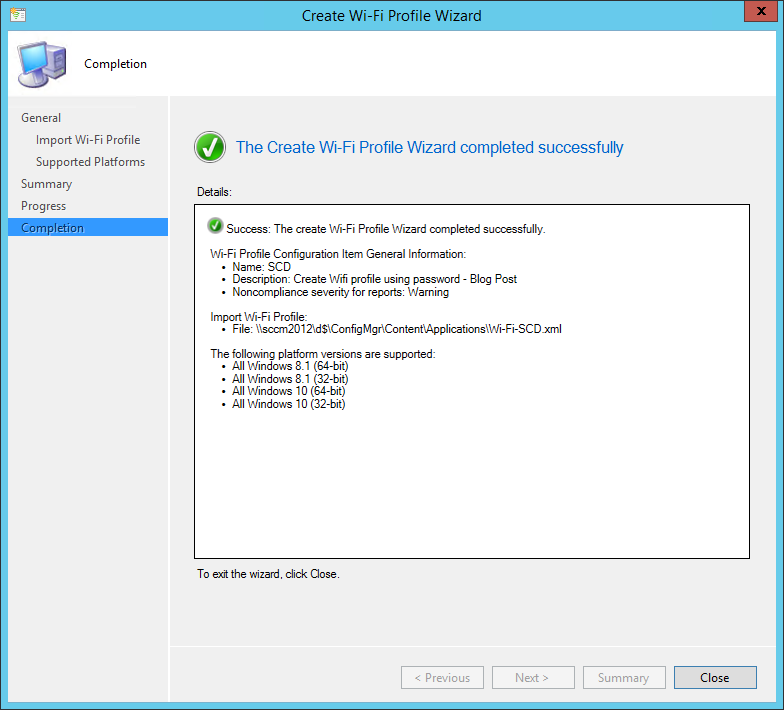
  • Wait for the wizard to complete and click Close

Deploy the Wifi Profiles

You are now ready to deploy the profile to your devices

  • Open the SCCM console
  • Go to Assets and Compliance / Compliance Settings / Company Resource Access / Wi-Fi Profiles
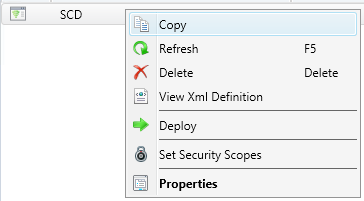
  • Right-click the profile and select Deploy
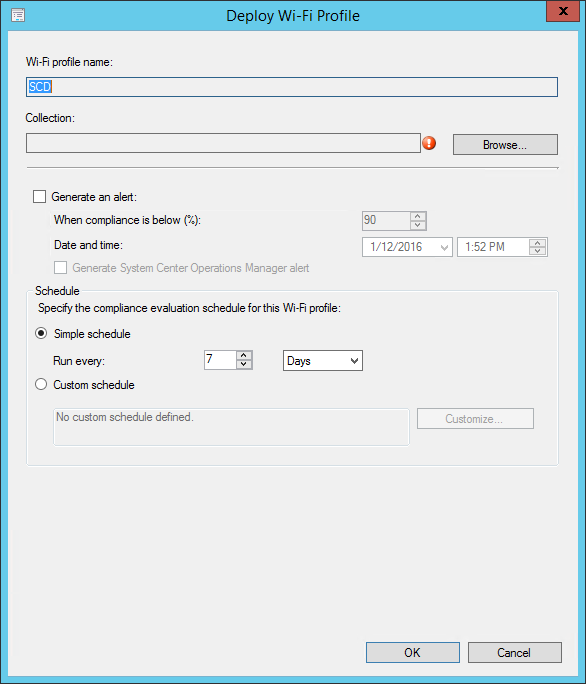
SCCM Wifi Profiles
  • Click Browse and select your collection
  • Specify the evaluation schedule, click Ok

Monitor the deployment

Like every deployment, you can monitor the status in the SCCM Console under Monitoring / Deployments

SCCM Wifi Profiles

You may notice that the Wifi Profiles deployments are treated as they were Configuration Items.

Once successfully deployed, the computers receiving the Wifi Profile will automatically connect to the specified network.

Delete SCCM Wifi Profile

A generic failure error 0x80041001 when deploying your SCCM wifi profile is usually caused because you already have a profile with the same name on the computer. SCCM can’t overide or delete an existing wifi profile.

In such case, we suggest to create a collection with the systems that gives an error and deploy a script to delete the wifi profile and starts an evaluation of the WiFi profile baseline you just created. To delete the wifi profile on a Windows 10 computer, use this command :

netsh wlan delete profile name=”network-name”

The simpliest way to send this command would be to use the script function in the SCCM console.

The post Deploy SCCM Wifi Profiles with Password to Windows 10 Devices appeared first on System Center Dudes.

Import Windows Devices for AutoPilot in Microsoft Endpoint Manager

$
0
0

Windows Autopilot is a solution designed that allows you to set up and pre-configure Windows devices for your environment using Azure and Endpoint Manager. The goal of Autopilot is to reduce the OS deployment complexity. If done correctly, a user logs to an out-of-box computer, logs on his computer with his ADD user account, and applications and configurations get deployed. All that with minimum infrastructure requirements. If you are new to Autopilot, we have a post that describes every step you need to do to get started.

Autopilot has its flaws but it’s improving very fast. One of those flaws was that device importation was made from the Windows Store for Business or the Microsoft Partner Center. Those days are over since you can now import your device directly from Endpoint Manager.

Endpoint Manager Autopilot device import

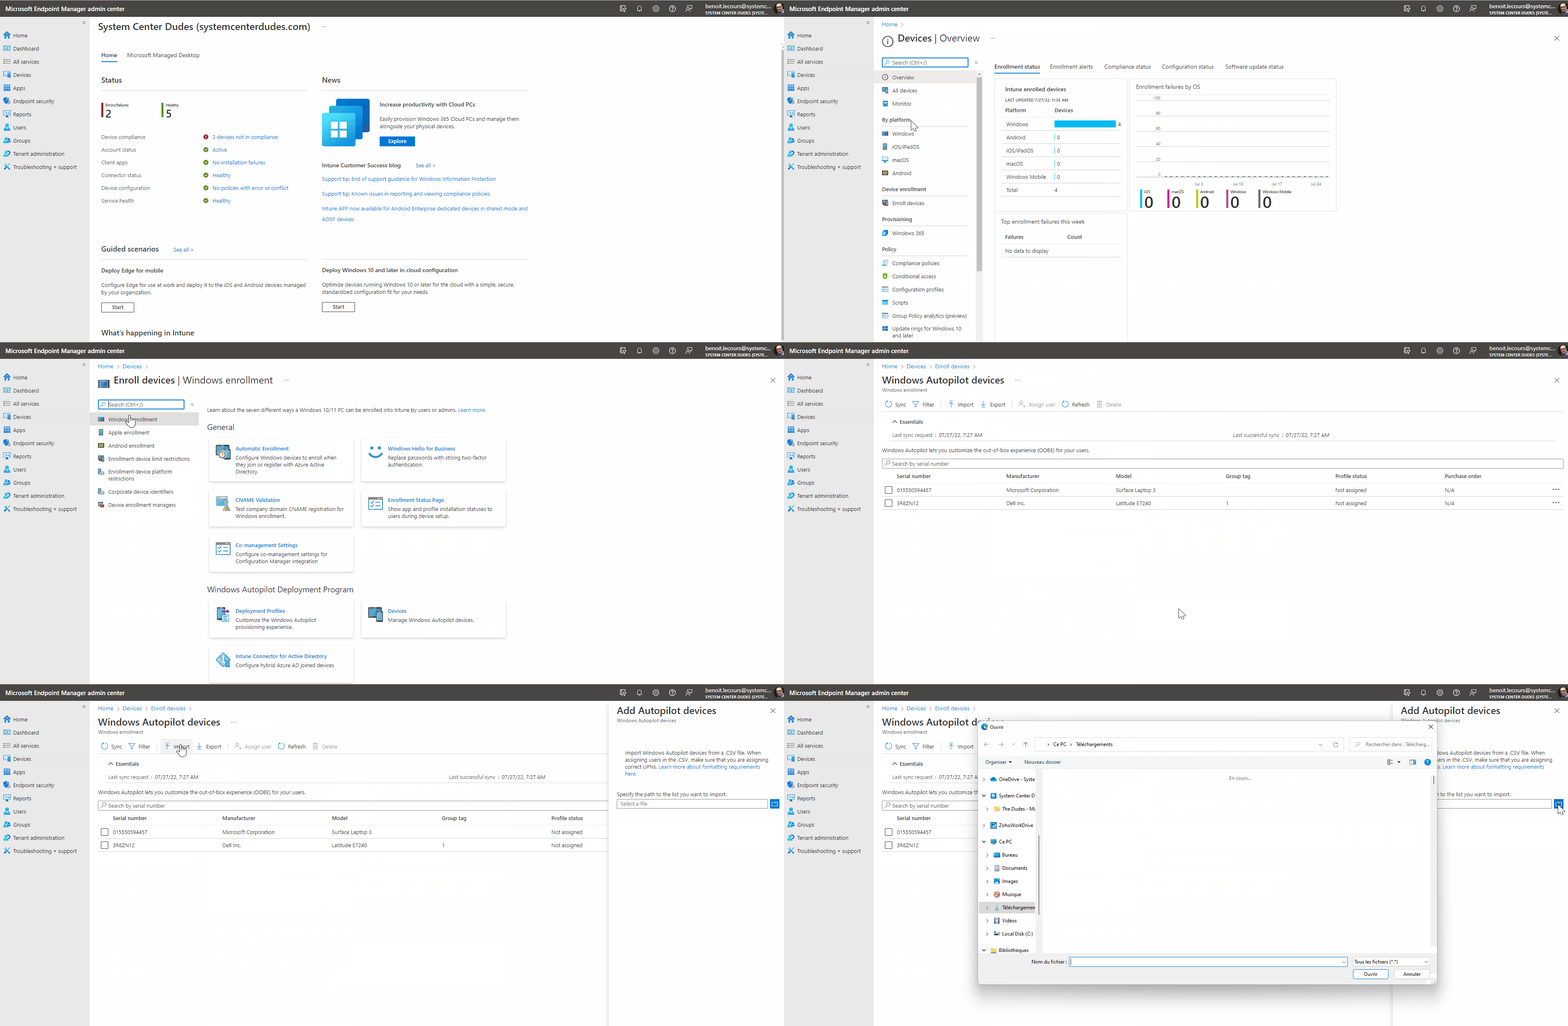
  • Launch Endpoint Manager
  • Select Device / Enroll Devices / Windows enrollment
  • In the Windows Autopilot Deployment Program pane, select Devices
  • Click on Import at the top

From there, you need to select a .CSV file. It’s not possible to import a single device manually.

As shown in the portal, the CSV file has some formatting requirements :

The header and line format must look like this:

  • <serialNumber>,<ProductID>,<hardwareHash>
  • Can have up to 500 rows in the file

This means that you need the Serial Number, Windows Product ID, Hardware Hash separated by a comma. You cannot have more than 500 rows/devices in the CSV.

To get this information for a specific machine, there are a couple of ways :

PowerShell – Endpoint Manager Autopilot device import

There is a script that is already available in Windows to get this information. As long as that device is running a supported version of Windows. You can use this PowerShell script. The required fields will be populated in a CSV file, ready to import into Endpoint Manager

From a Windows 10 1703+ computer

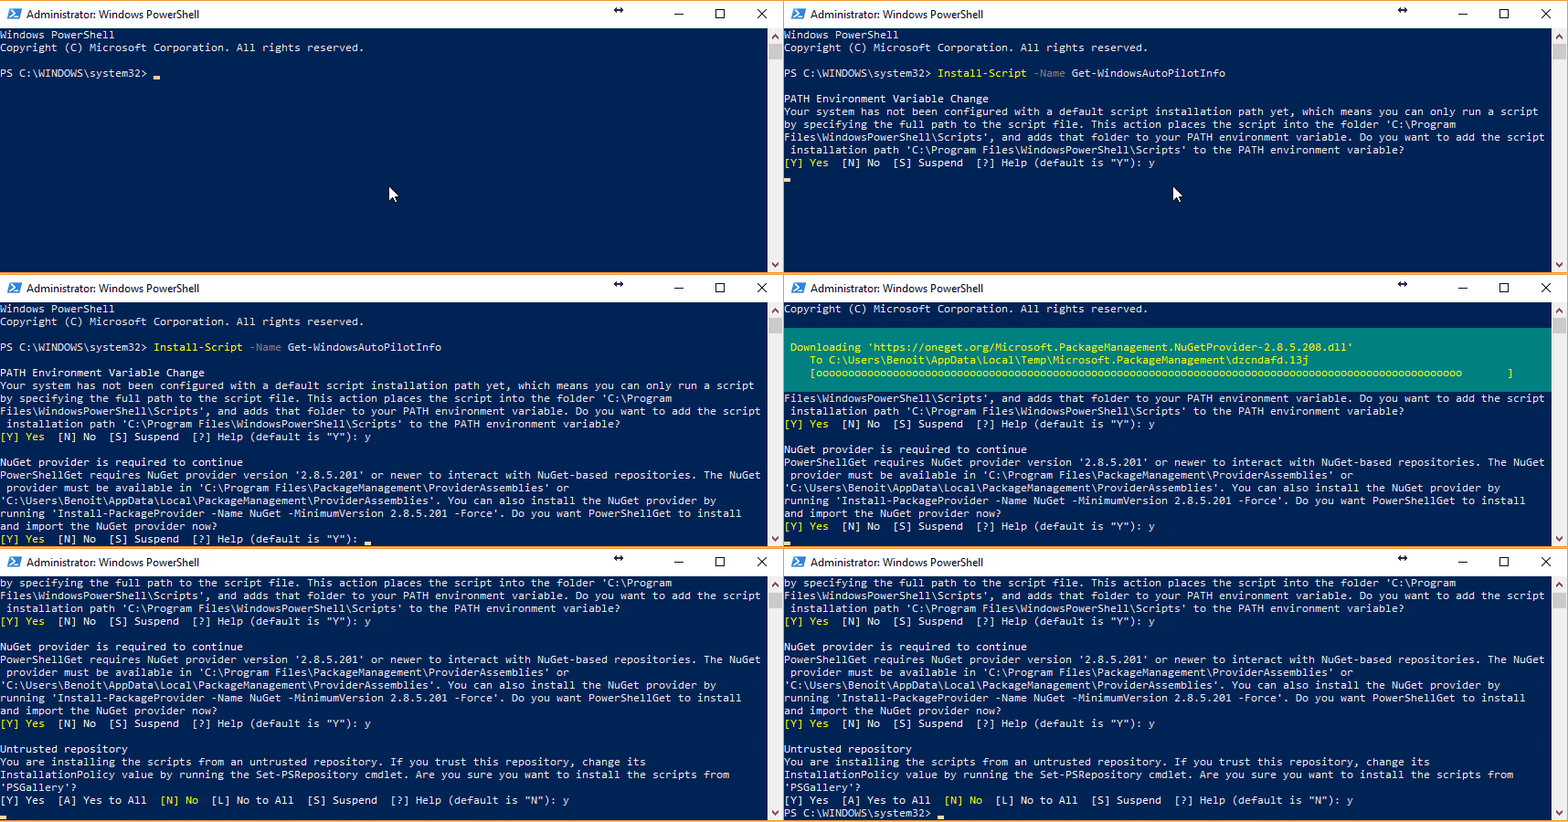
  • Start Windows PowerShell as an Administrator
  • Run the following command: Install-Script -Name Get-WindowsAutoPilotInfo
Microsoft Intune Autopilot device import
  • This action places the script into the folder C:\Program Files\WindowsPowerShell\Scripts
  • Run the script : Get-WindowsAutoPilotInfo -Outputfile C:\temp\SCD.csv
  • The script will output the result in the C:\temp\SCD.csv file
  • Open the CSV file, it should look like this :

SCCM / Configuration Manager

If the device is managed by SCCM, you can extract the SerialNumber, ProductID and hardwareHash from a built-in report. All you have to do is to Export the data from the report to a CSV file.

  • Go to the Monitoring / Reporting /Reports, / Hardware – General
  • Run the report, Windows Autopilot Device Information
Endpoint Manager Autopilot device import
  • Select the Export icon, and choose the CSV (comma-delimited) option
Endpoint Manager Autopilot device import
  • The extracted CSV file must be edited before importing since the file header is incorrect.

Import the file

Once your CSV file is ready, head back to the Endpoint Manager Portal, select your CSV file and select Import at the bottom

  • You will receive an Import notification. It will take about 5-10 minutes
Endpoint Manager Autopilot device import
  • Device is imported
Endpoint Manager Autopilot device import

It will take a moment to show in your device list but will eventually appear. The device will also be visible from the Windows Store for Business portal. The device is now imported in Endpoint Manager and ready for Autopilot deployment.

The post Import Windows Devices for AutoPilot in Microsoft Endpoint Manager appeared first on System Center Dudes.

Customize Windows Start Menu for SCCM Deployments

$
0
0

The reason to Customize Windows Start Menu is a must for any organization to deploy a standard workstation and remove any unwanted software from it. Sometimes Microsoft makes small changes under the hood and can hardly be tracked unless an issue comes up to flag those changes. The configuration of the Start Menu and Taskbar for Windows 10 has been since the beginning a great challenge for administrators and it doesn’t look that this will change anytime soon. Windows 11 which came out recently share the same mechanism as Windows 10 when it comes to the Start Menu thus, this post can be used for Windows 11.

Microsoft added the following note to the start menu layout modification documentation after the 1703 release

Note
In Windows 10, version 1703, Export-StartLayout will use DesktopApplicationLinkPath for the .url shortcut. You must change DesktopApplicationLinkPath to DesktopApplicationID and provide the URL.

A simple note, with great implication!

Following our previous posts on Windows 10 Customization and how to modify the taskbar configuration, we will detail how to configure the start menu and taskbar with the latest indication from Microsoft.

Prerequisites

  • Windows 10 1703 and above
  • The following procedure works for Windows 11 as well

Configure Start Menu Windows 10

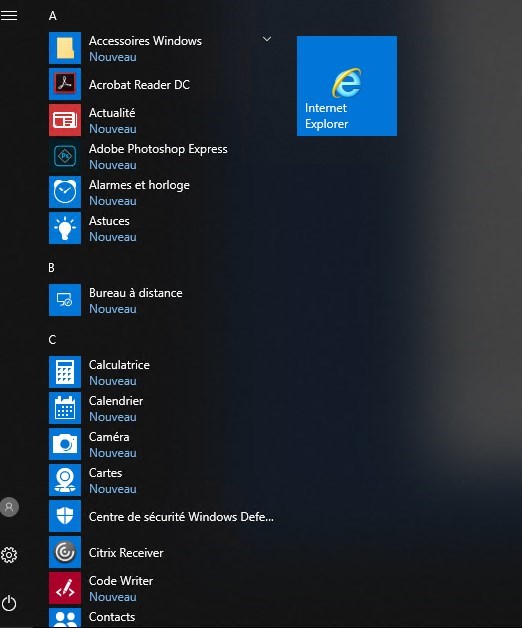
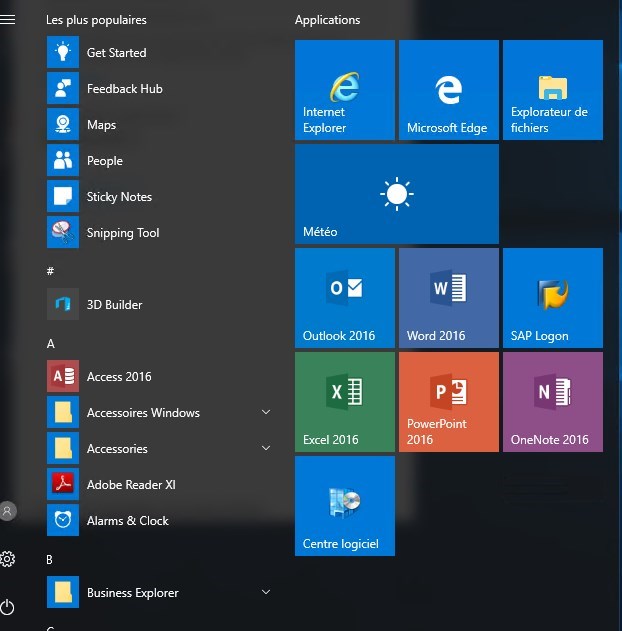
The first step to building a nice Start menu is to customize it manually :

  • Setup a Windows start menu as we would like to have
    • Remove all unwanted link
    • Classify your folder
    • Pin your important apps
Customize Windows Start Menu
  • Once your start menu is ready :
    • Start a PowerShell command window as an administrator
    • Enter the following command line to export the Start Menu
      • Export-StartLayout -path C:\temp\StartMenu.xml
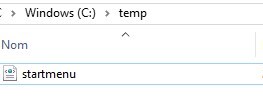
    • A StartMenu.xml file is generated in the specified directory
      • Application links are using the DesktopApplicationLinkPath
  • In Powershell, enter the following command :
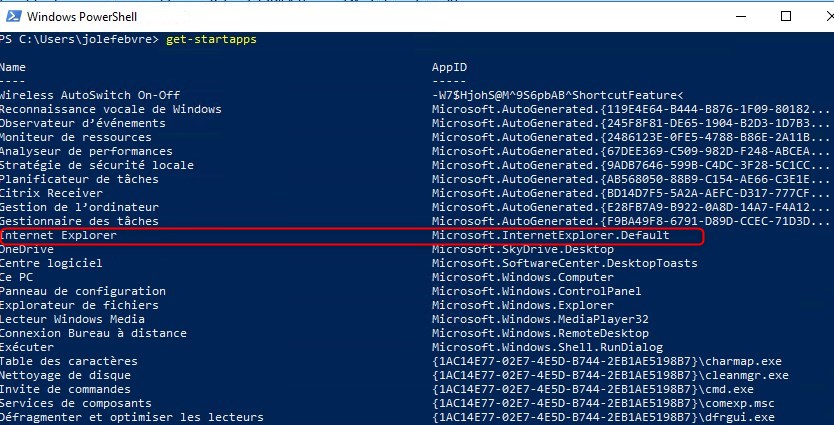
    • Get-StartApps
Customize Windows Start Menu
  • This returns the list of all applications in the Start Menu
  • Locate the application that uses the DesktopApplicationLinkPath and take note of the AppID
Customize Windows Start Menu
  • Go back to the XML exported previously and replace the DesktopApplicationLinkPath by the DesktopApplicationID

Once this is completed it can be added to your SCCM task sequence like we explain in our previous posts.

Important Info
If you wish to manage the Taskbar like we explained in our previous post, note that the DesktopApplicationLinkPath must be used as the DesktopApplicationID will not work.

Configure Start Menu Windows 10

More details about Customize Windows Start Menu are available on Docs.Microsoft.com

The post Customize Windows Start Menu for SCCM Deployments appeared first on System Center Dudes.

Customize Windows 10 Taskbar Configuration Using SCCM Task Sequence

$
0
0

With the release of Windows 10 1607, some customization solutions were modified. One of them is the ability to modify the Taskbar configuration. In a previous post, we provided many customization scripts and how-to that were made for Windows 10 version 1511. Modifying the Taskbar was one of those customization but it was more of a workaround than a planned how-to. With Windows 10 1607, the Taskbar can be modified similarly to the Start Menu. In addition, support for applying a customized taskbar using MDM (like Microsoft Intune) was added in Windows 10, version 1703.

In this post, we will detail how to modify the Windows 10 Taskbar configuration using a SCCM Task sequence. Customize Windows 10 Taskbar Configuration could also be done as part of a Group Policy.

If you have an XML file that’s used on Windows 10 devices, you can also use it on Windows 11 devices. You may have to update the App IDs.

SCCM Windows 10 Taskbar Configuration Prerequisites

Using this SCCM Taskbar customization solution is only available for Windows 10 version 1607 and higher. As stated in the introduction it also applies to Windows 11

Before we begin

It’s important to understand the concept behind customizing the Taskbar. It uses the same Layout Modification method as the Start Menu. It means that if you already use an XML to modify the layout of the Start Menu, you will need to use the same file with a new section in the XML. You can’t have an XML for the Start Menu and a separate one for the Taskbar. If you do, the last to be imported will be the only configuration applied to both the Start menu and Taskbar.

Configure a StartMenu.xml layout

  • Setup a Windows 10 start menu as we would like to have as the default

If you do not wish to modify the Start Menu and leave it by default, you can skip this section and go directly to the Taskbar configuration section.

SCCM Windows 11 Taskbar configuration
  • Start a PowerShell command window as administrator
  • Enter the following command line to export the Start Menu
    • Export-startlayout -path C:\temp\StartMenu.xml
  • A StartMenu.xml is generated in the specified directory
SCCM Windows 10 Taskbar configuration

More details can be found in this Technet article

Add Windows 10 Taskbar configuration to StartMenu.xml

The easy part was to generate the StartMenu.xml file, the though part is ahead. There is no configure-and-export solution for the Taskbar. Instead, we must manually edit the sections in the XML file to include the desired configuration for the Taskbar.

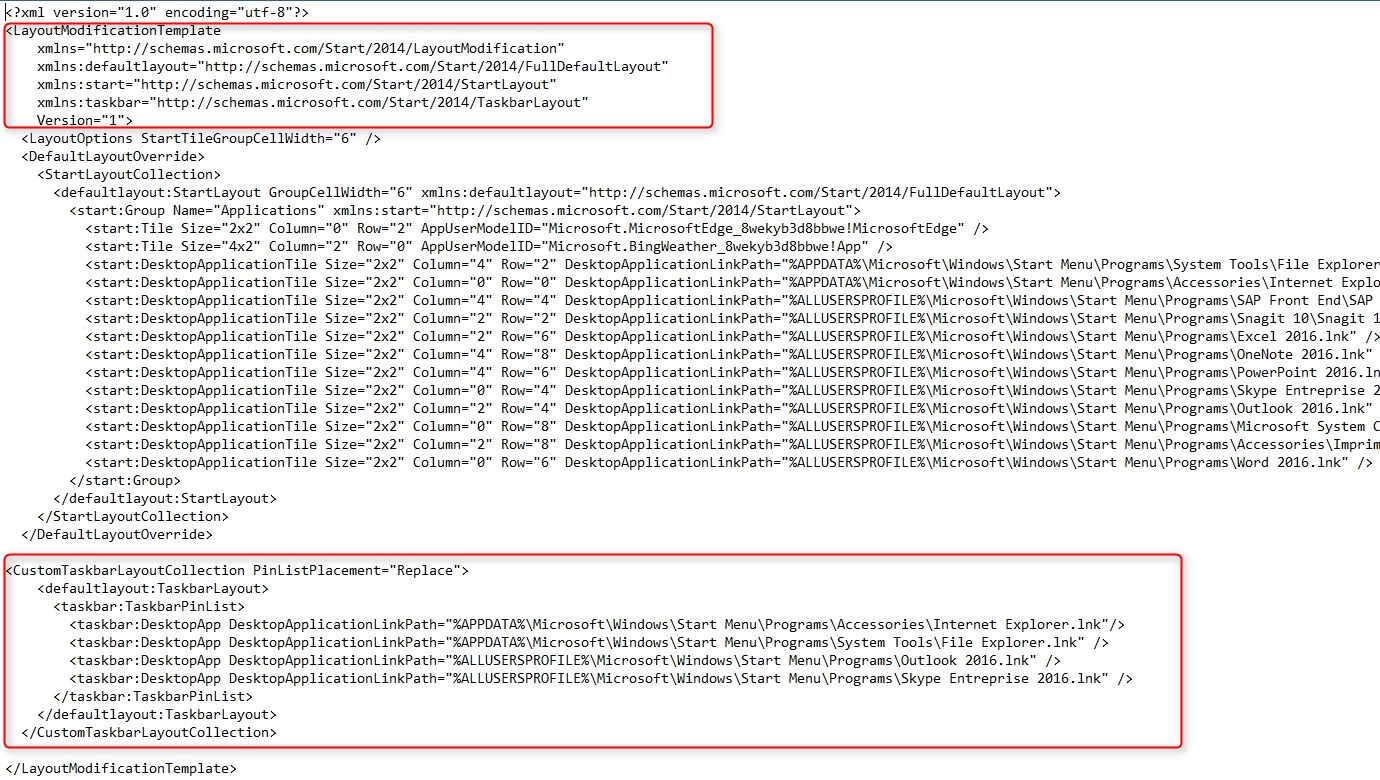
  • Replace the top section of LayoutModificationTemplate. This will “Enable” the Start Menu and Taskbar.

<LayoutModificationTemplate Version=”1″ xmlns=”http://schemas.microsoft.com/Start/2014/LayoutModification”>

<?xml version=”1.0″ encoding=”utf-8″?>
<LayoutModificationTemplate
xmlns=”http://schemas.microsoft.com/Start/2014/LayoutModification”
xmlns:defaultlayout=”http://schemas.microsoft.com/Start/2014/FullDefaultLayout”
xmlns:start=”http://schemas.microsoft.com/Start/2014/StartLayout”
xmlns:taskbar=”http://schemas.microsoft.com/Start/2014/TaskbarLayout”
Version=”1″>

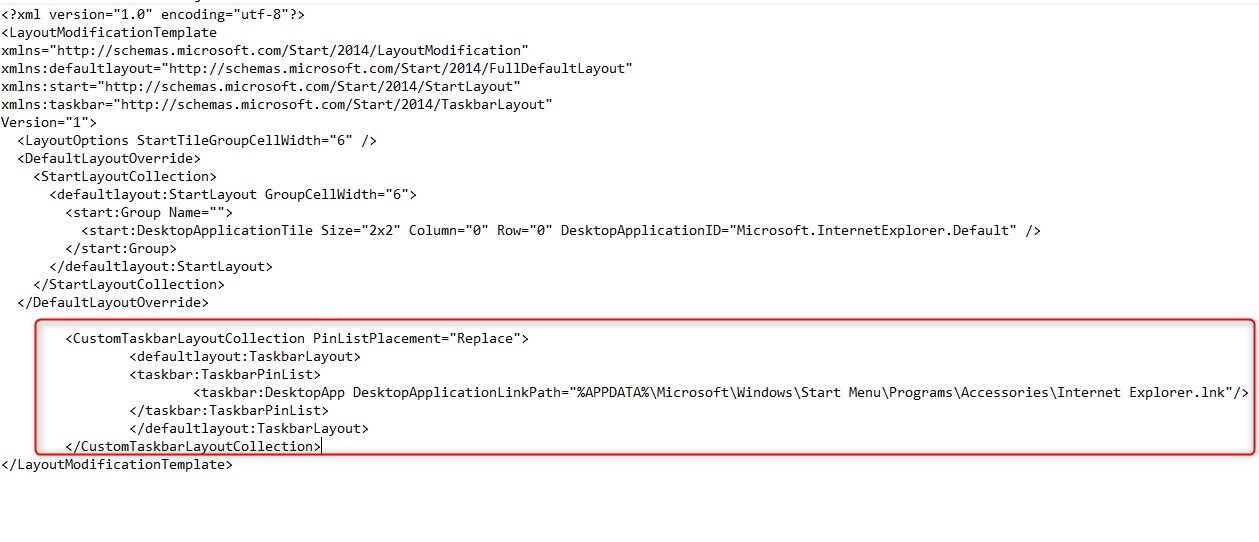
  • Add a new section after the </DefaultLayoutOverride> section. This is where you’ll be adding your shortcuts. We will be adding Internet Explorer, Explorer, Outlook and Skype.

<CustomTaskbarLayoutCollection PinListPlacement=”Replace”>
<defaultlayout:TaskbarLayout>
<taskbar:TaskbarPinList>
<taskbar:DesktopApp DesktopApplicationLinkPath=”%APPDATA%\Microsoft\Windows\Start Menu\Programs\Accessories\Internet Explorer.lnk“/>
<taskbar:DesktopApp DesktopApplicationLinkPath=”%APPDATA%\Microsoft\Windows\Start Menu\Programs\System Tools\File Explorer.lnk” />
<taskbar:DesktopApp DesktopApplicationLinkPath=”%ALLUSERSPROFILE%\Microsoft\Windows\Start Menu\Programs\Outlook 2016.lnk” />
<taskbar:DesktopApp DesktopApplicationLinkPath=”%ALLUSERSPROFILE%\Microsoft\Windows\Start Menu\Programs\Skype Entreprise 2016.lnk” />
</taskbar:TaskbarPinList>
</defaultlayout:TaskbarLayout>
</CustomTaskbarLayoutCollection>

The end result will look like this :

SCCM Windows 11 Taskbar configuration

The order of apps in the XML file dictates the order of pinned apps on the Taskbar from left to right, to the right of any existing apps pinned by the user.

The following example shows how apps will be pinned: Windows default apps to the left (blue circle), apps pinned by the user in the center (orange triangle), and apps that you pin using the XML file to the right (green square).

More details can be found in this Technet article to edit the XML as you wish.

Add the Start Menu and TaskBar configuration to a Task sequence

We will now deploy our configuration using a Task Sequence.

  • Go to Software Library \ Operating Systems \ Task Sequences
  • Right-click and Edit your Windows 10 task sequence
  • Select Add / General / Run Command Line
    • Name : Set Start Menu Layout
    • Command line : Powershell.exe Import-StartLayout -LayoutPath StartMenu\StartMenu.xml -MountPath C:\
    • Check the Package box and specify your Windows 10 customization package
  • Position this step after the Windows image has been deployed

SCCM Windows 10 Taskbar Configuration Results

After a new deployment, the user profile will load with a modified Start Menu and Taskbar.

Default view :

SCCM Windows 10 Taskbar configuration

Modified with the StartMenu.xml :

SCCM Windows 10 Taskbar configuration

The order fits our XML file order. File Explorer is left because it’s a Windows default app.

Bonus – Hide Cortana from the Taskbar

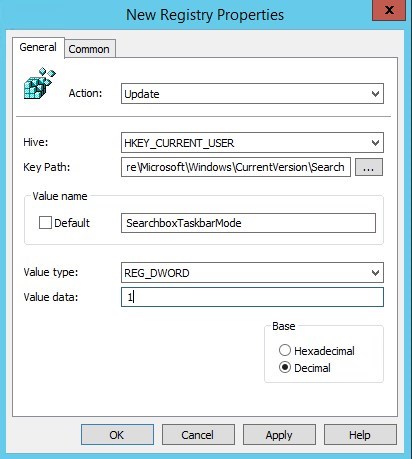
If you want to see less or no Cortana at all in the taskbar, configure the following Regkey with a group policy preference :

  • HKEY_CURRENT_USER\SOFTWARE\Microsoft\Windows\CurrentVersion\Search
  • SearchboxTaskbarMode DWORD
  • 0 = Hidden
SCCM Windows 10 Taskbar configuration
  • 1 = Show search or Cortana icon
SCCM Windows 10 Taskbar configuration
  • 2 = Show search box
SCCM Windows 10 Taskbar configuration

Here’s how the Registry configuration looks in Group Policy Preference :

SCCM Windows 11 Taskbar configuration

Hope this help!

The post Customize Windows 10 Taskbar Configuration Using SCCM Task Sequence appeared first on System Center Dudes.

How to upgrade to Windows 11 with Intune

$
0
0

With Windows 10 going end-of-life in a little more than a year from now (October 2025), it is time, yet again, to plan, prepare and roll out the newest version, Windows 11. Thankfully, this should be way easier than past experiences with many solutions available and the great work from Microsoft to ease such Feature updates. This post will detail how to roll out Windows 11 Upgrade using Intune.

Intune Windows 11 Upgrade Prerequisites

Before deploying a Windows feature update there are some obvious requirements :

Windows 10 edition that supports the Windows 11 upgrade :

  • Windows 10/11 Enterprise E3/E5
  • Windows 10/11 Education E3/E5
  • Microsoft 365 Business Premium

Note that Windows Pro SKU can receive the Feature Update policy, but will be minimum support. For example, the Gradual rollout won’t work on Pro SKU. The Windows LTSC version doesn’t support this upgrade method.

Create a Feature Update policy for Windows 11 with Intune

In Intune, we’ll create and deploy a feature updates policy. See this profile as managing which Windows 11 build is allowed with a starting date for devices targeted. It is essentially publishing the Feature Update to managed devices.

This will NOT act as a deadline to enforce the Feature Update.

  • Log in to the Microsoft Intune portal
  • Select Devices / Windows / Feature updates for Windows 10 and later and click Create profile
Intune Windows 11 Upgrade
  • Set the Name, select the Feature Update to deploy and finally specify the rollout options
Intune Windows 11 Upgrade
  • Once created, assign the Feature Update profile to a designated group. Note that this can be a user group, not mandatory to use a device group.

So when will the Windows 11 Feature Update be enforced?

The Update Ring Feature deferral will determine when the new Feature update will be enforced. The number of days here is based on the release date of the Feature Update from Microsoft.

This means that Windows 11 23h2 was released more than 6 months ago, any Feature deferral below that, will be ready to go now.

The Deadline for feature updates will impact when it will actually be enforced, with the grace period and pending restart behaviour to be similar to quality update process.

Intune Windows 11 Upgrade

Note, according to Microsoft, the Deadline for feature updates is ignored by Windows 11 21h2 and earlier, meaning Windows 10 also. The Deadline for Quality Update will impact Windows 10 performing the feature Update to Windows 11.

The official deadline behaviour documentation is definitively worth reading, see Microsoft docs.

Monitor Windows 11 Feature Update with Intune

  • Under Reports / Windows Update / Reports, there is the Windows Feature Update report
Intune Windows 11 Upgrade
  • Details are available per users and devices

It is also possible to follow Feature Update rollout with the newest Windows Update for business report, using the workbook in Log Analytics. See our post Configure Windows Update for Business Reporting

For more details about Feature Update with Intune, see Microsoft Docs.

The post How to upgrade to Windows 11 with Intune appeared first on System Center Dudes.

Viewing all 73 articles
Browse latest View live